
The material presented in this tutorial is based primarily on the material given in the 'Tutorial Manual' of the SYBYL software package.
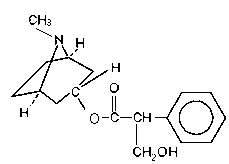
Fig.1 Atropine
After completing this tutorial, you will be able to, a.o. :
BUILD/EDIT >>> ZAP (DELETE) MOLECULE
If there is more than one molecule on the screen, click ALL, then
OK to wipe them all.
Use the RESET gadget to reset EVERYTHING
Use the DISPLAY OPTIONS to reset to FULL screen mode.
BUILD/EDIT >>> SKETCH MOLECULE...
When entering this mode, two menus appear: the 'Sketch Molecule Menu' and
an 'Atomic Symbol Menu'. Your are placed in DRAW mode, automatically.
Select GRID from the Sketch Molecule Menu
This button can be toggled off by re-selecting it again.
Pick a point in space in the middle of the screen
A highlighted cross appears, representing an unconnected atom. The highlight
indicates that this atom is the point of attachment when a subsequent point
is chosen as next atom. This is called 'coninuous drawing mode'.
Pick another point above and right the first one
Fig.2 6-membered ring
When you close the ring by picking the first atom again,
not atom is highlighted, indicating the continuous 'draw' mode is
temporarily deactivated. Continuous draw mode is always suspended when an
existing atom is chosen, whether it is the current atom of attachment or another
atom. In the former case, no bond is drawn; while in the latter case, a bond is
drawn and then continuous draw mode is deactivated.
Select N from the atomic symbol menu.
A label appears indicating that the type has been changed successfully
and the atom is colored blue.
Use the right mouse button an rotate the molecule about the x-axis
until it has an orientation similar to that in fig. 3.
Fig.3 Sketched molecule after rotation
Select MOVE from the Sketch Molecule Menu.
The molecule should now look similar to the one shown in fig.4., but don't be
concerned if your structure is not a perfect 'chair'. The ring will be optimized
later.
Fig.4 Sketched molecule after moving
atoms
Select DRAW on the Sketch Menu to return to continuous draw mode.
Fig.5 Sketched molecule with a bridge
added
Select TAILOR on the Sketch Molecule Menu
There is an initial setup period while the minimizer parameters are being
read from a database. Energy values are then printed in the text window
after each iteration. The molecule display on the screen is not updated
until the end of the minimization in order to reduce execution time.
The minimization is complete when the "Existing atom or new point:"
prompt returns in the text window.
Select CENTER on the Sketch Molecule Menu.
Rotate the molecule until its orientation is similar to the one in Fig.6.
Fig.6 Sketched molecule with added chain
Select atom 4 as the current atom of attachment.
Select atom 10 as the new point of attachment and then pick a point
above and right of atom 10.
Pick atom 1 (the nitrogen) the a point to its left.
Select O from the atomic symbol menu and then pick each of
the three atoms corresponding to those labeled O in fig. 7.
The atoms are labeled O and colored red to reflect the change.
Select GROUP on the Sketch Molecule Menu
Fig.7 Sketched molecule with
phenyl group added and oxygens defined
Select CHIRAL on the Sketch Molecule Menu and then select atom 11
(See fig.7).
If atom 11 is already an S chiral center, a message is displayed informing you
of this and nothing else happens. If, however, the R chiral center has been
sketched, the center is inverted to assume the proper stereochemistry.
Since the ring system has already been optimized, use the 4_SCAN option,
which involves non ring bonds only, to clean up the model. (Note that any
clean up option from 1 to 6 includes all options preceeding it in the list,
therefore, all non ring bonds have their bond lengths and angles adjusted, and all
torsion angles are scanned and adjusted to relieve bad contacts.)
Select TAILOR on the Sketch Molecule Menu.
Select ADDH on the Sketch Molecule Menu.
All atom and bond types are automatically converted to SYBYL types
based on connectivity prior to adding hydrogen atoms.
Select EXIT on the Sketch Molecule menu.
A final clean up is done automatically every time you exit the Sketch Molecule menu.
Select BUILD/EDIT >>> Name Molecule... and type ATROPINE (press OK)
Select FILE >>> SAVE AS... and type atropine (press OK)
A file 'atropine.mol2' will be created. Note that the filetype is autmoatically
added, and that the filename is case sensitive.
This concludes the small molecule sketching tutorial.
We suggest that you repeat this tutorial on your own molecules of interest.
Other SYBYL tutorials:
Return to the
main SYBYL tutorial page.
Sketch mode
Select M1:<EMPTY> (press OK)Build first piperidine ring
Continue picking points to form a 6-membered ring as in fig. 2
Close the ring by selecting the first atom again: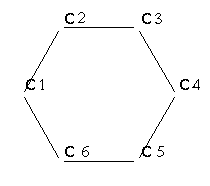
Pick atom 1 on the sketched molecule.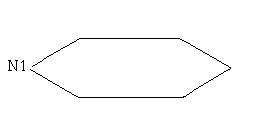
Select N in the ring and then pick a location that is somewhere
above the ring.
Select atom 4 and move it below the ring by the same amount.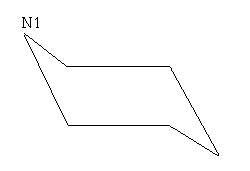
Add bridge and clean up
Pick atom 2 as the current attachment atom.
Pick a point below this atom and then another point diagonal to it.
Pick atom 6 to close the ring.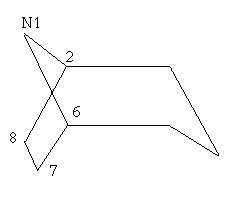
Select CLEAN_UP (and press OK)
Select 5_QUICK_MINIMIZE (and press OK)
Press END
Select CLEAN_UP on the Sketch Molecule Menu.Adding a chain and a group
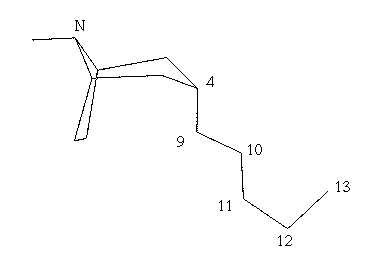
Referring to fig.6, sketch the side chain by picking successive points at
approximate locations on the screen for atoms 9 through 13.
Pick atom 13 again to deactivate continuous drawing mode.
Pick atom 10 again.
The double bond appears and continuous drawing mode is deactivated since
an axisting atom was chosen.
Select PHENYL and pick atom 11
Select CENTER again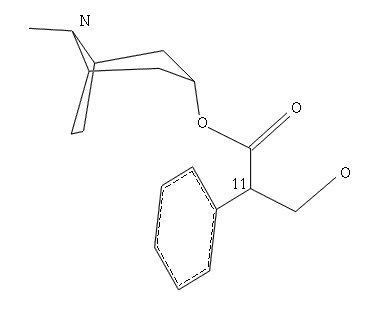
Checking chirality and cleaning up
Select S (and press OK)
Select CLEAN_UP (and press OK)
Select 4_SCAN (press OK)
Press END